Pickling vegetables is an ancient art that has found its way into modern kitchens because it brings a burst of flavor to almost any meal you can imagine. This recipe is all about capturing the fresh crunch of garden produce and preserving it in a tangy liquid that transforms simple greens and roots into something truly extraordinary and mouthwatering. When you learn how to pickle at home you are not just making a side dish but you are creating a pantry staple that can brighten up a heavy dinner or add a zingy kick to a boring afternoon snack. You will find that the process is surprisingly easy and requires only a few basic kitchen tools along with fresh ingredients that you probably already have in your fridge or pantry right now. The beauty of this recipe lies in its total simplicity because you do not need fancy equipment or a chemistry degree to get perfect results every single time you try it out.
People across the world love pickled vegetables because they provide a perfect balance of salty and sour notes that make your taste buds dance with excitement. There is something incredibly satisfying about the crisp texture of a cold pickled carrot or the sharp bite of a red onion that has been soaking in vinegar and spices for a few days. Many folks enjoy the way these colorful jars look sitting on their kitchen counters or inside their refrigerators because they represent a healthy lifestyle and a love for homemade food. Beyond the amazing taste these treats are beloved because they offer a way to reduce food waste by using up extra vegetables before they go bad in the crisper drawer. It is a hobby that rewards you with delicious snacks while also giving you a sense of pride as you see your beautiful glass jars filled with vibrant colors and aromatic herbs.
You should make this recipe whenever you feel like your meals need a little extra personality or when you want to impress your friends at a weekend barbecue or a simple family gathering. Making your own pickles is a great emotional outlet because it connects you to traditional cooking methods and allows you to slow down and enjoy the process of preparing food by hand. From a fitness perspective many people choose pickled vegetables because they are very low in calories but high in satisfaction which helps you stay on track with your health goals without feeling like you are missing out on flavor. It is also the perfect project for a rainy afternoon when you want your home to smell like warm spices and tangy vinegar instead of just plain air. Whether you are feeling creative or just hungry for a snack that has a lot of crunch this recipe is exactly what you need to lift your spirits and fill your belly.
Imagine sitting down to a big plate of grilled food and having the perfect acidic companion to cut through the richness of the meat or the creaminess of a potato salad. This recipe is designed for beginners who want to explore the world of fermentation and pickling without any of the stress or complicated rules that sometimes come with advanced food preservation techniques. By following these simple steps you will create a jar of goodness that stays fresh for weeks and provides a healthy dose of vitamins in every single bite you take. It is a wonderful feeling to open your fridge and pull out a jar that you made yourself knowing exactly what went into it without any hidden chemicals or weird preservatives. Get ready to transform your kitchen into a little pickling factory where the only limit is your imagination and the variety of vegetables you decide to toss into your jars today.
Ingredients You Will Need
To get the best results you should gather all your items before you start the cooking process so you do not have to hunt for things while your liquid is boiling on the stove. These measurements are for a standard batch that fills two medium glass jars.
-
2 cups of white vinegar or apple cider vinegar
-
2 cups of filtered water
-
2 tablespoons of sea salt or pickling salt
-
2 tablespoons of white granulated sugar
-
4 cloves of fresh garlic peeled and smashed
-
2 teaspoons of whole black peppercorns
-
1 teaspoon of mustard seeds
-
1 teaspoon of red pepper flakes for a little bit of heat
-
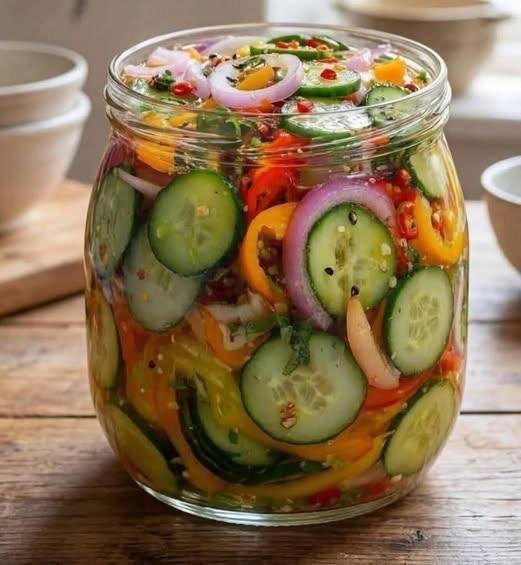
2 large carrots peeled and cut into thin sticks
-
1 medium cucumber sliced into thick rounds
-
1 small red onion thinly sliced into rings
-
1 cup of cauliflower florets cut into bite sized pieces
-
4 sprigs of fresh dill or any other herb you like
Step by Step Method
Start by washing all your vegetables thoroughly under cold running water to remove any dirt or debris that might be hiding on the skins. Once they are clean you should peel the carrots and onions while leaving the skin on the cucumbers if you enjoy that extra bit of texture and color in your jar. Cut your vegetables into shapes that you enjoy eating such as long spears or round coins or even small cubes depending on how you plan to serve them later. Grab two clean glass jars with tight fitting lids and make sure they are completely dry before you start packing them with your colorful vegetable pieces.
Divide your garlic cloves and spices equally between the two jars so that the flavor is balanced and every bite has a bit of that aromatic goodness. Now you can begin packing the vegetables into the jars as tightly as you can without crushing them because they will shrink just a little bit once the hot liquid hits them. It is fun to layer the different colors like putting the orange carrots next to the green cucumbers to make the jar look like a work of art. Leave about one inch of space at the top of the jar so that the liquid can cover everything completely without spilling over the edges when you close the lid.
In a medium pot over medium high heat combine your vinegar and water along with the salt and the sugar to create the pickling brine. Stir the mixture constantly until the salt and sugar have completely dissolved into the liquid which usually takes about three or four minutes once it starts to simmer. Do not let the liquid reach a rolling boil for too long because you do not want too much of the vinegar to evaporate away into the air. Once the brine is clear and hot you can carefully remove the pot from the stove and prepare to pour it over your prepared vegetables.
Carefully pour the hot brine into each jar until all the vegetables are fully submerged and covered by the liquid. If you see any air bubbles trapped between the vegetables you can gently tap the jar on the counter or use a clean spoon to move things around until the bubbles rise to the surface. Place the lids on the jars but do not tighten them all the way just yet because you need to let the jars cool down to room temperature on your counter. This cooling process is important for the safety of the glass and the quality of the vegetables.
Once the jars are cool to the touch you can tighten the lids firmly and place them in the back of your refrigerator where it is nice and cold. While you can eat them after just a few hours they will taste much better if you let them sit for at least twenty four hours so the flavors have time to soak deep into the vegetables. These quick pickles will stay fresh and crunchy for up to three weeks in the fridge although they are so delicious that they usually disappear much faster than that. Always use a clean fork to take pickles out of the jar to keep the liquid clean and safe for the remaining pieces.
Why This Recipe Is Special
This recipe is special because it gives you total control over what you are eating which is something you rarely get with store bought canned goods. Most pickles you buy in a grocery store are loaded with yellow dyes and high fructose corn syrup along with massive amounts of sodium that can make you feel bloated. By making them at home you use natural salt and real sugar along with fresh herbs that provide actual nutritional value and a much cleaner taste. The vinegar acts as a natural preservative and a digestive aid which can help your stomach feel better after a large meal.
Another reason this recipe stands out is the incredible texture that stays crunchy and firm instead of becoming soft and mushy like some cooked vegetables. The quick pickling method preserves the structure of the cells in the vegetables so you get that loud snap every time you take a bite. It is also a very budget friendly way to eat more vegetables because you can buy produce in bulk when it is on sale and turn it into a gourmet snack for just pennies per serving. It is a truly rewarding experience to see your fridge filled with healthy options that you created with your own two hands.
Extra Tips for Better Taste
If you want to take your pickled vegetables to the next level you can try adding a slice of fresh ginger or a piece of turmeric root to the brine for an earthy and warm flavor. For those who love spicy food adding a whole habanero pepper or a few extra jalapeño slices will give the pickles a serious kick that pairs perfectly with tacos or burgers. You can also experiment with different types of vinegar like rice vinegar for a softer and sweeter taste or red wine vinegar for a robust and bold profile. Adding a teaspoon of honey instead of white sugar can provide a floral note that works beautifully with pickled beets or red onions.
Always make sure your vegetables are as fresh as possible because the quality of the raw produce directly affects the final result of your pickling project. Soft or wilting vegetables will not get crunchy again just because they are in vinegar so pick the firmest ones you can find at the market. If you want your pickles to look even more professional you can use a crinkle cutter to give the edges a wavy shape which also helps the brine soak in more effectively. Do not be afraid to mix and match different vegetables in the same jar to create a colorful medley that offers a different flavor in every forkful.
Final Thoughts
Making pickled vegetables is a simple joy that brings a lot of excitement to your daily cooking routine and helps you appreciate the natural flavors of the earth. It is a skill that you can pass down to your children or share with your neighbors by giving them a beautiful jar as a thoughtful homemade gift. Once you start pickling you will find yourself looking at every vegetable in the grocery store and wondering how it would taste after a soak in a tangy brine. We hope you enjoy this easy process and that it brings a lot of crunch and happiness to your kitchen for many years to come.
Nutrition Details
The following table shows the estimated nutrition for a typical serving of these pickled vegetables. Please remember that these values can change based on the specific vegetables you choose to use.
| Nutrient | Amount Per Serving |
| Calories | 15 calories |
| Total Fat | 0 grams |
| Sodium | 280 milligrams |
| Total Carbohydrates | 3 grams |
| Dietary Fiber | 1 gram |
| Sugars | 2 grams |
| Protein | 0 grams |
| Vitamin A | 10% Daily Value |
| Vitamin C | 8% Daily Value |
Disclaimer
This recipe is intended for informational purposes and for general enjoyment in your home kitchen. Please be aware that everyone has a different body and different health needs so the nutritional results and how your body reacts to vinegar or salt may vary from person to person. If you have specific health concerns or are on a low sodium diet you should talk to a doctor before eating large amounts of pickled foods. Always ensure your jars are clean and your vegetables are fresh to avoid any risk of foodborne illness.