Making fresh bread at home is one of the most beautiful experiences you can have in your kitchen because it fills your entire house with a warm and comforting smell that instantly makes everyone feel happy and safe. This simple seeded bread recipe is designed for people who want to enjoy the amazing taste of bakery quality bread without needing any complex kitchen skills or fancy tools that confuse beginners. Many people feel afraid of baking with yeast because they think it is a difficult science project that can easily fail if they make a small mistake, but this specific recipe removes all that stress by using simple steps and easy terms. You do not need to be a professional chef or have years of experience to master this loaf because it guides you through the process like a helpful friend sitting right next to you on your kitchen counter. By combining basic pantry staples with a beautiful mix of healthy seeds, you will create a golden loaf that has a crunchy outer crust and a wonderfully soft interior that stays fresh for days.
People absolutely love this recipe because it gives them complete control over what goes into their food while delivering a massive boost of flavor and texture that store bought loaves simply cannot match. When you buy commercial bread from a supermarket, you are often getting a lot of hidden preservatives, extra sugars, and artificial chemicals that are only there to extend shelf life rather than improve your health or taste. This homemade alternative relies on pure ingredients that you can actually pronounce, which makes it a huge favorite for parents who want to feed their children wholesome meals without any mystery additives. The addition of crunchy seeds like sunflower seeds, chia seeds, sesame seeds, and flaxseeds adds a delightful nutty flavor and a satisfying crunch that makes every single bite an exciting experience for your mouth. It is also incredibly forgiving, meaning that even if your dough does not look absolutely perfect before it goes into the oven, it will still bake into a stunning and delicious masterpiece that your family will devour.
There are so many wonderful reasons and perfect moments to bake this bread, whether you are looking for a relaxing weekend activity to calm your mind or trying to hit your personal fitness goals with nutritious food. Baking bread is a deeply therapeutic process that allows you to slow down from your busy modern life, use your hands to create something real, and practice mindfulness while watching simple ingredients transform into a beautiful meal. From a health and fitness perspective, this loaf is packed with plant based proteins, healthy fats, and dietary fiber that keep you feeling full and energized for hours, making it the perfect fuel for busy mornings or post workout snacks. Imagine waking up on a quiet Sunday morning to the aroma of this loaf baking in your oven, then cutting a thick slice while it is still warm and watching a pat of rich butter melt instantly into the soft crumbs. It is perfect for fancy holiday brunches, simple weekday sandwiches, or just as a comforting snack paired with a hot cup of tea or coffee when you need a little afternoon pick me up.
This recipe is also a fantastic way to introduce your kids or your friends to the joy of cooking because it teaches the basic principles of baking in a fun and completely stress free environment. You will quickly find that making your own bread becomes a proud routine rather than a chore because the taste difference is so vast that you will never want to go back to processed options again. It connects us to older traditions where food was made with patience and love, yet it fits perfectly into a modern schedule because the hands on work takes only a fraction of the total time. Whether you want to impress your guests at a dinner party, improve your daily nutrition, or simply enjoy the ultimate comfort food, this seeded loaf delivers on every single promise. Grab your mixing bowl and let us explore how easy it is to create this incredible bread from scratch.
Ingredients You Will Need
To make this beautiful loaf, you will need to gather a few simple ingredients that you can easily find at your local grocery store. Please measure them carefully to ensure your bread turns out perfectly soft and delicious.
-
Four cups of unbleached all purpose flour or whole wheat flour
-
Two teaspoons of active dry yeast or instant yeast
-
One and a half teaspoons of fine sea salt
-
One and a half cups of warm water at ninety degrees Fahrenheit
-
Two tablespoons of pure honey or pure maple syrup
-
Two tablespoons of melted unsalted butter or olive oil
-
One third cup of raw sunflower seeds
-
One third cup of raw pumpkin seeds
-
Two tablespoons of whole chia seeds
-
Two tablespoons of brown flaxseeds
-
Two tablespoons of white sesame seeds
-
One extra tablespoon of mixed seeds to sprinkle on the top crust
Step by Step Method
Step One: Activating the Yeast
Start by taking a large glass measuring cup and filling it with your one and a half cups of warm water. It is very important that the water is warm like a cozy bath but not hot, because hot water will kill your yeast and your bread will not rise. Stir your two tablespoons of honey into the warm water until it dissolves completely, as this provides the natural sugar that the yeast needs to wake up and grow. Sprinkle your two teaspoons of active dry yeast over the top of the water and give it a gentle stir with a spoon. Let this mixture sit undisturbed on your counter for about ten minutes until it becomes frothy, bubbly, and smells like fresh beer, which proves your yeast is alive and ready to work.
Step Two: Mixing the Dry Ingredients
While your yeast is waking up in the cup, take a very large mixing bowl and add your four cups of flour along with your one and a half teaspoons of fine sea salt. Whisk the flour and salt together thoroughly so the salt is evenly distributed throughout the bowl. Now add your sunflower seeds, pumpkin seeds, chia seeds, flaxseeds, and sesame seeds directly into the flour. Use a large spoon or a spatula to toss the seeds with the flour until they are completely scattered, ensuring that every single slice of your finished bread will have an equal amount of crunchy goodness.
Step Three: Creating the Dough
Make a small hollow well in the very center of your flour and seed mixture using your hand or a spoon. Pour your melted unsalted butter or olive oil directly into that well, and then pour in your bubbly yeast and water mixture. Use a sturdy wooden spoon or your clean hands to start mixing everything together, moving from the inside of the bowl outward. Keep stirring until the flour absorbs all the liquid and a shaggy, sticky dough starts to form together into a single ball. If there is still dry flour left at the bottom of the bowl, you can add one extra tablespoon of warm water to help it join the rest of the dough.
Step Four: Kneading the Dough
Lightly dust a clean, flat countertop or a large cutting board with a spoonful of extra flour so your dough does not stick to the surface. Turn your shaggy dough ball out onto this floured surface and begin the fun process of kneading. To knead, use the heels of your hands to push the dough firmly away from you, then fold the dough back over itself, turn it a quarter turn, and push it away again. Repeat this rhythmic pushing, folding, and turning motion for about ten minutes until the dough transforms from a rough sticky mess into a smooth, stretchy, and beautiful ball. You can test if it is ready by gently pressing your finger into the dough, and if it springs back quickly, you have kneaded it enough.
Step Five: The First Rise
Take a clean large bowl and grease the inside surfaces lightly with a drizzle of olive oil or a small rub of butter. Place your beautiful smooth dough ball inside the greased bowl and turn it over once so the top of the dough gets a tiny coating of oil, which prevents it from drying out. Cover the top of the bowl tightly with a clean kitchen towel or some plastic wrap to keep the moisture inside. Place the covered bowl in a warm, draft free spot in your home, such as inside an turned off oven with the oven light switched on. Let the dough rest peacefully for about one hour or until it has expanded to double its original size.
Step Six: Shaping the Loaf
After the hour has passed, gently press your fist into the center of the puffy dough to deflate the large air bubbles that have formed inside. Turn the dough out onto your lightly floured countertop once again and gently press it with your hands into a flat rectangle shape that matches the length of your baking pan. Roll the rectangle up tightly from one short side to the other, forming a neat log shape that looks like a jelly roll. Pinch the final seam closed with your fingers so the log stays together during the baking process.
Step Seven: Coating and the Second Rise
Take a standard loaf pan and grease it thoroughly with butter or nonstick cooking spray so your bread releases easily later. If you want a beautiful bakery look, lightly mist the top of your shaped dough log with a tiny bit of water using a spray bottle or your wet fingers. Sprinkle your extra tablespoon of mixed seeds onto your clean counter and gently roll the top of your damp dough log over the seeds so they stick firmly to the surface. Place the seed covered dough log seam side down into your greased loaf pan, cover it loosely with your kitchen towel, and let it rise a second time for about forty minutes until it puffs up over the rim of the pan.
Step Eight: Baking to Golden Perfection
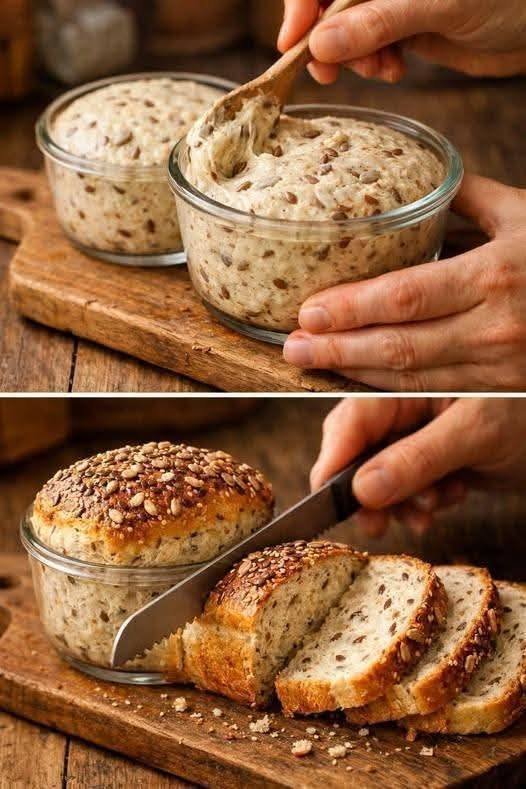
While your loaf is finishing its second rise, heat your oven to three hundred seventy five degrees Fahrenheit so it is nice and hot when the bread goes inside. Once the bread has puffed up beautifully, remove the towel and place the loaf pan onto the center rack of your preheated oven. Bake the bread for about thirty five to forty minutes without opening the oven door too often. You will know your bread is perfectly done when the top crust turns a deep golden brown color and the seeds look beautifully toasted. To be absolutely sure, carefully remove the loaf from the pan and tap the bottom with your knuckles, as it should sound hollow like a small drum.
Step Nine: Cooling and Slicing
Place the baked loaf onto a wire cooling rack and resist the strong temptation to slice into it immediately. Allowing the bread to cool completely for at least one full hour is a vital step because the interior structure is still finishing its cooking process from the trapped steam. If you slice it while it is boiling hot, the inside can become gummy and wet, which ruins the texture. Once the hour has passed, use a sharp serrated bread knife to cut beautiful, thick slices and enjoy your amazing creation.
Why This Recipe Is Special
This simple seeded bread recipe stands out from ordinary white bread recipes because it combines incredible flavor with wonderful health rewards that make your body feel amazing. The mix of four different seeds turns every slice into a powerhouse of nutrition, delivering essential omega three fatty acids from the flaxseeds and chia seeds, which are fantastic for supporting your brain health and keeping your heart strong. The pumpkin seeds and sunflower seeds add a wonderful dose of plant based protein and essential minerals like zinc and magnesium, which help boost your immune system and keep your energy levels steady throughout a busy day. Because we are using whole food ingredients and avoiding processed sugars, this bread has a lower glycemic index, meaning it digests slowly and prevents those nasty blood sugar crashes that leave you feeling tired and grumpy.
Beyond the physical health benefits, this recipe is special because of the pure sensory joy it brings to your everyday eating routine. The contrast between the ultra crunchy outer crust and the soft, pillowy interior creates a delightful texture that makes simple meals feel like an upscale restaurant experience. It contains no weird dough conditioners, artificial softeners, or strange chemical colorings, giving you the peace of mind that you are nourishing yourself with real food. It is a highly customizable recipe that acts as a canvas for your kitchen creativity, allowing you to switch up the ingredients based on what you have available in your cupboards. Most importantly, it restores the ancient human connection to scratch cooking, giving you a wonderful sense of personal accomplishment every time you pull a gorgeous, steaming loaf out of your own oven.
Extra Tips for Better Taste
-
To get an even deeper and richer flavor from your seeds, try lightly toasting them in a dry skillet over medium heat for three minutes before adding them to your flour mix.
-
If you love a super shiny and ultra crispy crust, brush the top of your dough log with a simple wash made from one egg beaten with a tablespoon of water right before it goes into the oven.
-
You can substitute a half cup of your all purpose flour with rye flour or pumpernickel flour to give your bread an old world European taste that pairs beautifully with savory toppings.
-
For a sweet twist that children absolutely adore, add a half cup of dried cranberries or raisins along with a teaspoon of ground cinnamon to the dough during the mixing phase.
-
If your house is quite cold during the winter months, you can help your dough rise by placing the bowl next to a warm mug of hot water inside your turned off microwave.
-
Always store your leftovers in a sealed paper bag or a specialized bread box rather than a plastic bag to keep the crust from becoming soft and soggy.
-
If your loaf starts to get a bit stale after four days, do not throw it away because it makes the most incredible French toast or crunchy garlic croutons for your salads.
Final Thoughts
Baking your own simple seeded bread is a wonderful journey that brings warmth, health, and immense satisfaction into your daily life. It proves that you do not need complicated equipment or mysterious skills to feed yourself and your loved ones with high quality, delicious food. Once you take your first bite of this crunchy, nutty loaf, you will realize how simple and rewarding scratch baking can truly be. Enjoy the process, share a slice with someone you love, and celebrate the wonderful joy of homemade cooking.
Nutrition Details
| Nutrient Type | Amount Per Serving | Daily Value Percentage |
| Calories | One hundred eighty calories | Nine percent |
| Total Fat | Six grams | Eight percent |
| Saturated Fat | One gram | Five percent |
| Sodium | Two hundred ninety milligrams | Twelve percent |
| Total Carbohydrates | Twenty six grams | Nine percent |
| Dietary Fiber | Four grams | Fourteen percent |
| Sugars | Two grams | Two percent |
| Protein | Six grams | Twelve percent |
| Calcium | Forty milligrams | Four percent |
| Iron | Two milligrams | Eleven percent |
Note: The nutrition values listed above are calculated based on one standard slice of bread, assuming the total loaf is cut into fourteen equal slices. Your actual numbers may vary slightly based on the exact brands of flour and seeds you choose to purchase.
Disclaimer
The health and nutrition information provided in this article is meant for educational and informational purposes only and should not be treated as professional medical advice. Every individual body is completely unique, and your personal nutritional needs or dietary reactions may change based on your health status, activity levels, and medical history. If you have specific food allergies, medical conditions, or health concerns, please consult with a qualified healthcare professional or a registered dietitian before making major changes to your diet.