The Ultimate Guide to Making the Best Homemade No Knead Bread
No knead bread is a revolutionary way of baking that allows anyone to create a professional loaf of crusty bread without any of the hard physical labor usually required in a kitchen. This recipe is all about letting time and nature do the heavy lifting for you instead of using your arms to push and pull the dough for twenty minutes at a time. It relies on a very simple scientific process where a high moisture dough sits for a long period to develop its own gluten structure naturally while you are sleeping or working. When you follow this method you are aiming for a loaf that looks like it came from a fancy village bakery in Europe with a dark and crispy crust and a very soft interior full of beautiful air bubbles. It is a dish that proves you do not need expensive mixers or special skills to produce a high quality food that satisfies your soul and your stomach. This guide will walk you through the tiny details like the importance of using a hot pot and the magic of a long fermentation period to ensure you get a perfect result every single time you bake. By the time you finish reading this article you will be able to create a masterpiece that smells like a dream and tastes better than anything you can buy at a regular grocery store.
People absolutely love no knead bread because it offers a sense of total freedom and confidence in the kitchen especially for those who are afraid of working with yeast. There is something very magical about mixing four basic ingredients in a bowl and coming back the next day to find a bubbling and alive dough that is ready for the oven. It is a very friendly food that appeals to everyone from busy college students who want a cheap meal to retired grandparents who want to share a fresh loaf with their neighbors. The flavor profile is naturally deep and complex because the long resting period allows the yeast to create tiny amounts of natural acids that mimic the taste of expensive sourdough. Another reason for its huge popularity is that it is incredibly affordable and uses only the most basic pantry items like flour and water and salt. It is a dish that proves you can create a gourmet experience with almost zero effort and very little money spent on tools or fancy equipment. Most people find that once they try this method they never go back to buying processed bread again because the texture and the fresh aroma are simply impossible to beat in a home environment.
There are so many wonderful reasons to start a batch of no knead bread ranging from a quiet weekend morning to a big family dinner where you want to impress your guests. From an emotional perspective this dish is a great way to show love because the smell of baking bread is one of the most comforting and happy scents in the entire world. If you are looking for a fitness reason to enjoy this recipe you will be happy to know that homemade bread has no preservatives or hidden sugars or chemicals that are often found in factory made loaves. It provides a clean source of energy from complex carbohydrates and gives you total control over how much salt goes into your food for a healthier heart and body. You might choose to make this recipe when the weather is rainy and you want your home to feel warm and cozy or when you have a big pot of soup that needs a thick slice of crusty bread for dipping. The hands off nature of the dough means you can start it in the evening and have it ready for lunch the next day without having to wake up early or spend hours standing at your kitchen counter. It is a versatile meal that fits into a busy lifestyle because it respects your time while delivering a level of quality that feels like a true luxury in every single bite.
Choosing to bake your bread from scratch at home is a much better decision than relying on store bought options because you are participating in a tradition that is thousands of years old. You can choose high quality organic flour and filtered water to ensure your bread is as pure as possible while avoiding the plastic waste that comes with every loaf of bread from the supermarket. This article is written for beginners who might feel a little nervous about using yeast but want to learn the basics of creating a classic and reliable staple for their family. We have used very simple words and clear instructions so that you never feel lost or confused while you are working in your kitchen today or tomorrow. Baking should be a joy and a form of meditation that helps you slow down and appreciate the simple things in life like the sound of a crust cracking or the sight of steam rising from a hot slice. By the time you are done you will have a deep appreciation for the humble grain of wheat and how much joy it can bring to your life with just a little bit of salt and heat and time. Get your mixing bowl ready and find your favorite butter because we are about to dive into the world of the best no knead bread you have ever tasted.
Ingredients You Will Need
To make this classic and crusty no knead bread you should gather the following ingredients from your pantry or the local store:
-
3 cups of all purpose flour or bread flour for a stronger structure
-
1 and a half cups of warm water that is not too hot for the yeast
-
1 teaspoon of fine sea salt or kosher salt for flavor
-
Half a teaspoon of active dry yeast or instant yeast
-
A little bit of extra flour for dusting your hands and the counter
-
1 tablespoon of olive oil if you want a slightly softer crust
-
Optional cornmeal for the bottom of the pot to prevent sticking
Step by Step Method
Follow these very simple and detailed steps to create a perfect loaf of no knead bread even if you have never baked anything in your life:
Mixing the Dough
The first step is the easiest part of the whole process because there is no hard work involved. In a large glass or ceramic bowl mix the flour and the yeast and the salt together with a spoon until they are well combined. Pour the warm water into the bowl and stir the mixture until all the flour is wet and you have a shaggy and sticky ball of dough. You do not need to make it smooth or pretty at this stage because the water and the yeast will do the work later. Make sure there are no dry spots of flour left at the bottom of the bowl. Cover the bowl tightly with plastic wrap or a clean kitchen towel to keep the moisture inside.
The Long Rest
Place the covered bowl in a warm and quiet spot in your kitchen where it will not be disturbed for a long time. You need to let this dough sit for at least twelve hours although eighteen hours is even better for the best flavor and texture. During this time you will see the dough grow in size and develop many small bubbles on the surface which means the yeast is happy and working. This long rest allows the gluten to form on its own without you having to knead it with your hands. It is best to start this in the evening so that the dough is ready for the next morning or afternoon.
Shaping the Loaf
Once the dough has rested and looks bubbly and loose it is time to shape it for the oven. Sprinkle a generous amount of flour onto a clean counter or a piece of parchment paper. Gently scrape the sticky dough out of the bowl and onto the floured surface. Fold the edges of the dough toward the center a few times to form a rough ball shape. Do not press too hard because you want to keep those beautiful air bubbles inside. Cover the dough ball with a towel and let it rest for another thirty minutes while you get the oven ready for baking.
Heating the Pot
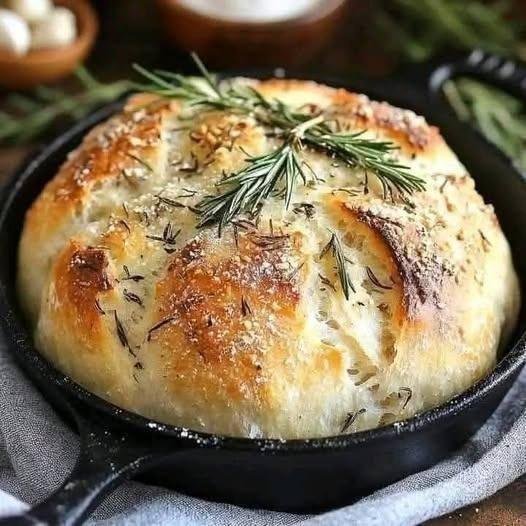
Preheat your oven to 450 degrees Fahrenheit and place a heavy pot with a lid inside while the oven is getting hot. A cast iron pot or a Dutch oven works best because it holds the heat and creates steam which is the secret to a crispy crust. Let the pot sit in the hot oven for at least thirty minutes so that it is extremely hot when you are ready to bake. This sudden heat will cause the bread to rise quickly and create a wonderful texture. Be very careful when handling the pot because it will be dangerous to touch with bare hands.
Baking the Bread
Carefully remove the hot pot from the oven and take off the lid using thick oven mitts. Lift your dough ball using the parchment paper or your floured hands and drop it gently into the center of the hot pot. Put the lid back on and place the pot in the oven to bake for thirty minutes. The lid traps the steam coming out of the dough which keeps the crust soft enough to expand. After thirty minutes remove the lid and bake for another fifteen minutes without the cover. This is when the crust will turn a beautiful golden brown and become very crispy. Remove the pot from the oven and lift the bread out to cool on a wire rack.
Why This Recipe Is Special
This no knead bread recipe is special because it takes the mystery out of professional baking and makes it a fun activity for everyone. By using a heavy pot and a long fermentation time you are mimicking the conditions of a large steam oven used by master bakers. This results in a crust that is thin and crunchy and an inside that is moist and chewy which is very difficult to achieve with traditional quick baking methods. The lack of kneading means that the internal structure of the bread is more open and airy which makes it feel lighter and more premium in your mouth.
It is also a very special recipe because it encourages people to slow down and enjoy the process of food creation. In our fast world we often want everything to be done in minutes but this bread teaches us that some things are worth waiting for. The natural development of flavor during the long rest creates a taste that is much more satisfying than bread made with a lot of sugar and fat. It is a recipe that celebrates the beauty of patience and the power of simple ingredients to create something that feels like a miracle every time you pull it out of the oven.
Extra Tips for Better Taste
To make your no knead bread even more delicious you can try adding some dried herbs like rosemary or thyme to the flour at the beginning. If you like a bit of a kick you can stir in some crushed red pepper flakes or some shredded sharp cheese for a savory version of the loaf. Another great tip is to use a little bit of whole wheat flour or rye flour in place of some of the white flour to give the bread an even deeper and more earthy flavor. Always make sure your yeast is fresh by checking the expiration date on the package before you start the mixing process.
If you want a very dark and bold crust you can spray a little bit of water into the pot right before you put the lid on to create even more steam. For a different texture you can sprinkle some sesame seeds or poppy seeds on top of the dough ball before it goes into the oven. If you find that the bottom of your bread is getting too dark you can place a baking sheet on the rack below your pot to block some of the direct heat. Always wait at least one hour before cutting into the bread because the inside is still finishing its cooking process even after it is out of the oven.
Final Thoughts
Making your own no knead bread is one of the most rewarding things you can do in your kitchen and it will surely bring a lot of joy to your home. It is a simple skill that reminds us that we can be self sufficient and create high quality food with our own hands and very little equipment. Whether you are serving this bread with a fancy cheese plate or just eating a slice with some local honey it is sure to be the best part of your day. We hope that this guide has shown you how easy and fun it can be to become a home baker. Enjoy the wonderful aroma of fresh bread in your house and cherish every single crunchy and soft bite of your beautiful creation.
Nutrition Details
Below is a table showing the approximate nutritional values for one thick slice of no knead bread based on a loaf cut into ten pieces.
| Nutrient | Amount Per Serving |
| Calories | 160 kcal |
| Total Fat | 1 gram |
| Saturated Fat | 0 grams |
| Cholesterol | 0 milligrams |
| Sodium | 240 milligrams |
| Total Carbohydrates | 32 grams |
| Dietary Fiber | 2 grams |
| Sugars | 0 grams |
| Protein | 5 grams |
| Calcium | 10 milligrams |
Note: These values are estimates based on standard all purpose flour and water. Your actual numbers might vary if you use different types of flour or if you add extra ingredients like seeds or cheese to your dough mixture.
Disclaimer
Please keep in mind that every person has a body that is different and your health needs are unique to you and your lifestyle. This article is meant to provide a fun recipe and general information but it is not professional medical or nutritional advice for your life. If you have specific health conditions like celiac disease or gluten sensitivity you should avoid this recipe or use a certified gluten free flour blend that is designed for bread making. Results in terms of taste and texture can change based on the humidity of your room and the accuracy of your oven temperature. Always practice safety in the kitchen when handling extremely hot pots and sharp bread knives.
Would you like me to help you find a great soup recipe that you can serve alongside your fresh no knead bread?