No Knead Bread
The art of making bread at home has always felt like a scary task for many people because of the hard work and time involved in the process. We often think that we need fancy machines or very strong arms to push and pull the dough for a long time just to get a good loaf of bread for dinner. This recipe for no knead bread is here to change that way of thinking completely because it is the easiest way to bake a fresh loaf in your own kitchen without any stress. The core idea behind this method is to let time do all the heavy lifting for you so that the gluten develops naturally while you are busy doing other things or even while you are sleeping. You only need a few basic things like flour and water and yeast to create something that looks and tastes like it came from a very expensive bakery in a big city. This is the perfect starting point for anyone who has ever felt afraid of working with yeast or dough because there is almost no way to mess it up if you follow the simple steps provided. Imagine waking up to the smell of fresh crusty bread without having spent your entire morning working over a messy kitchen counter because that is exactly what this recipe offers you.
People all over the world absolutely love this specific way of baking because it brings back the simple joy of slow living in a world that often feels far too fast and loud. There is a deep sense of satisfaction that comes from mixing a sticky bowl of flour and water and seeing it transform into a bubbly and alive piece of dough after a few hours of rest. You do not need to worry about your technique or whether you are pressing the dough correctly because the science of fermentation takes care of everything inside the bowl while it sits quietly on your counter. Many bakers love that this bread has a very crispy and golden crust that makes a beautiful sound when you tap it with your fingers after it comes out of the hot oven. Inside the bread you will find large air pockets and a soft texture that is perfect for soaking up olive oil or spreading with thick layers of salty yellow butter. It is a very forgiving recipe which means that even if your measurements are not perfectly exact you will still end up with a delicious piece of food that your family will enjoy. This method has become a favorite for busy parents and students and workers because it fits perfectly into a modern schedule where time is a very precious thing.
You should make this bread whenever you want to feel a sense of peace and accomplishment in your daily life because the process of baking is very good for the soul and the mind. There is a strong emotional connection to bread because it has been a staple of human life for thousands of years and making it yourself connects you to that long history of tradition. If you are feeling a bit stressed or overwhelmed the simple act of mixing these ingredients together can be a very grounding experience that helps you focus on the present moment. From a taste perspective you should make this bread because the slow rise allows the flavors to develop in a way that quick bread simply cannot match in any kitchen. The yeast has more time to eat the sugars in the flour which creates a slightly tangy and complex flavor that is very similar to traditional sourdough bread but without the extra work of a starter. From a fitness and health reason you should choose this homemade bread because it contains no strange chemicals or preservatives that are often found in the plastic bags of bread at the grocery store. You know exactly what is going inside your body and you can control the amount of salt used to make sure it fits your specific dietary needs and goals.
The best time to start this recipe is in the evening right before you go to bed so that the dough can sit and grow while the house is quiet and dark. When you wake up the next morning you will find a bowl full of potential that is ready to be shaped and baked into a masterpiece for your lunch or a special weekend brunch. It is a wonderful feeling to pull a steaming hot loaf out of the oven and hear the crust crackle as it begins to cool down on the wire rack. You can share this bread with your neighbors or bring it to a dinner party and everyone will be very impressed that you made such a professional looking loaf with your own hands. This recipe is not just about eating but about the journey of watching simple things turn into something grand and nourishing for the people you love the most. Once you try this method you will likely never want to go back to buying pre sliced bread from a store because the quality and the pride of baking it yourself are far too good to give up. It is a small gift you can give to yourself every single week to make your home feel warm and cozy and full of life.
Ingredients You Will Need
-
3 cups of all purpose flour or bread flour
-
1 and a half cups of lukewarm water
-
1 teaspoon of active dry yeast
-
1 and a half teaspoons of fine sea salt
-
Extra flour for dusting your hands and the counter
-
A small amount of vegetable oil to grease the bowl
Step by Step Method
The first thing you need to do is find a large mixing bowl that has enough room for the dough to grow to double its original size. Pour your three cups of flour into the bowl and add the salt and the dry yeast then use a large spoon to mix these dry parts together until they are well combined.
Next you will pour the lukewarm water into the center of the flour mixture and you must make sure the water is not too hot because high heat will kill the tiny yeast organisms. Use a wooden spoon or even your clean hands to stir the mixture until it forms a very shaggy and sticky ball of dough. You do not need to smooth it out or make it look pretty at this stage because it is supposed to look a bit messy and wet.
Once the dough is mixed you should cover the bowl very tightly with a piece of plastic wrap or a clean damp kitchen towel to keep the moisture inside. Place the bowl in a warm spot in your kitchen where it will not be disturbed by cold drafts or loud noises for at least twelve hours and up to eighteen hours. This long rest is the most important part of the whole process because it allows the bubbles to form and the structure of the bread to build itself.
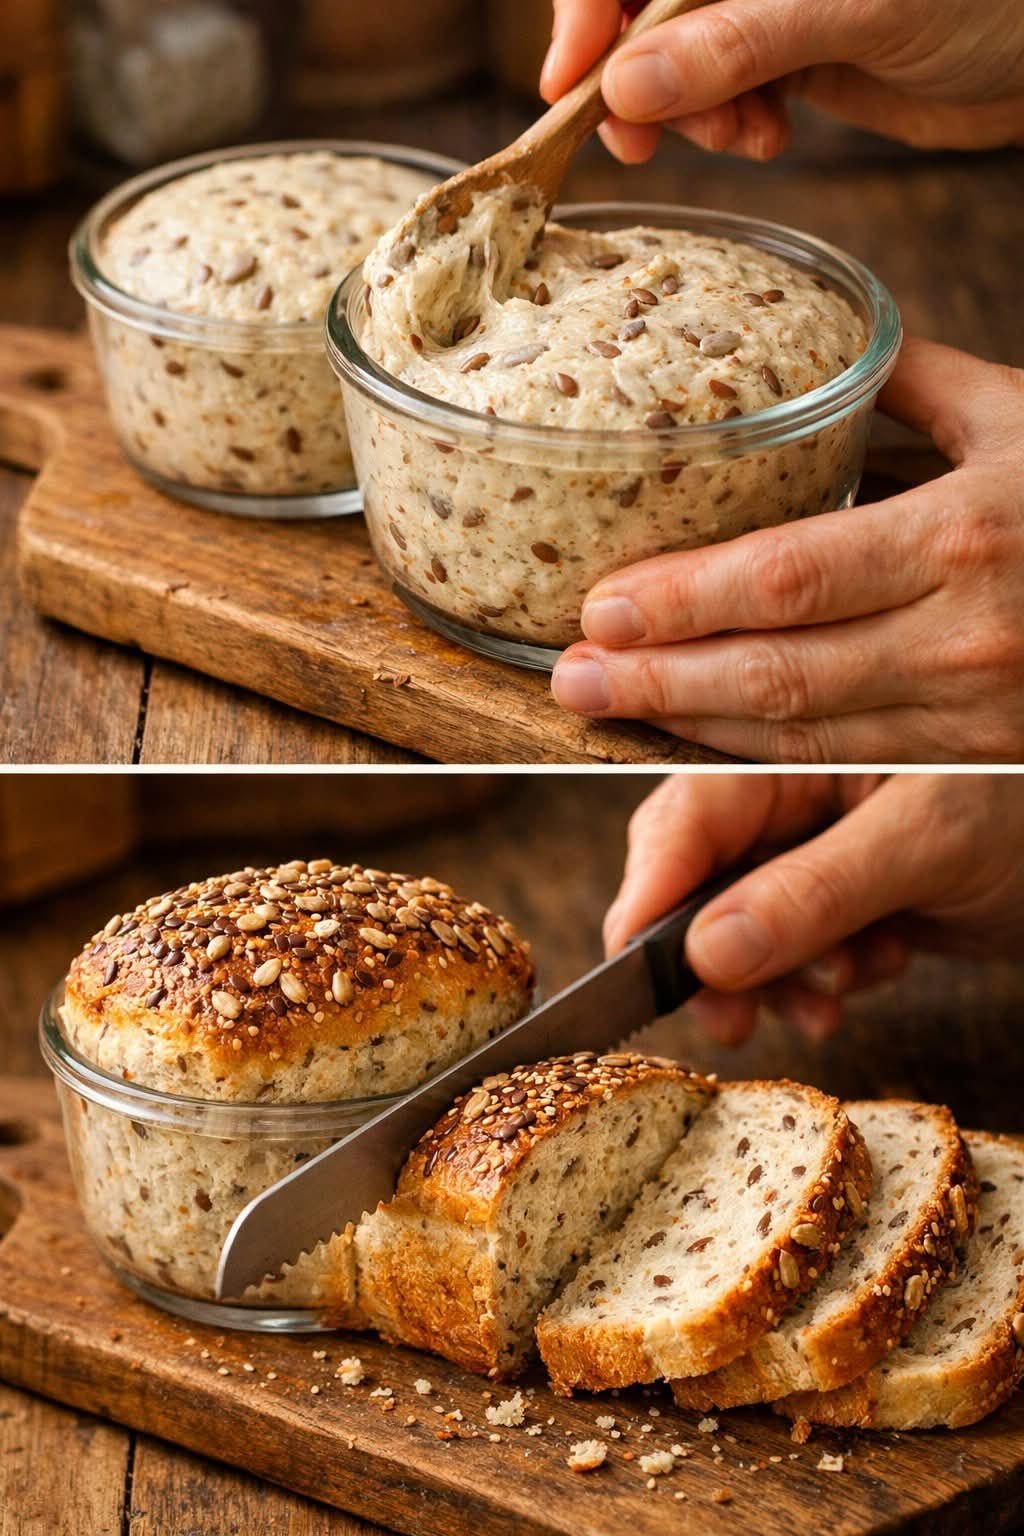
After the long wait you will see that the dough has become very bubbly and has grown quite a lot in size. Sprinkle a good amount of flour onto a clean flat surface like your kitchen counter and gently tip the dough out of the bowl onto the flour. The dough will be very sticky so you should put some flour on your fingers too to keep it from sticking to your skin.
Gently fold the dough over itself once or twice just to form a rough round shape but do not push the air out of it because those bubbles are what make the bread light. Let the shaped dough rest on the counter for about thirty minutes while you get your oven ready for the baking part.
Place a heavy pot with a lid like a dutch oven inside your oven and turn the heat up to four hundred and fifty degrees Fahrenheit. Letting the pot get very hot before you put the dough inside is the secret to getting a very crispy crust that tastes like a professional bakery loaf.
When the oven and the pot are both very hot you must be very careful as you remove the lid because it will be burning. Lift the dough gently and drop it into the center of the hot pot then put the lid back on and slide it into the oven. Bake the bread with the lid on for thirty minutes which creates steam that keeps the bread soft while it grows.
After thirty minutes you should remove the lid and bake the bread for another fifteen or twenty minutes until the top is a deep golden brown color. You will know it is done if the crust feels hard and sounds hollow when you give it a little tap with your knuckles.
Carefully remove the bread from the pot and place it on a wire rack to cool down completely before you try to slice it. It is very tempting to cut into it right away but if you wait the inside will finish cooking and the texture will be much better for eating.
Why This Recipe Is Special
This recipe is special because it removes the barrier between a regular person and the world of professional baking by making it simple and accessible. It proves that you do not need expensive tools or a lot of physical strength to create high quality food that nourishes your family and friends. From a health point of view this bread is a great choice because it uses the power of long fermentation which can make the grains easier for your stomach to digest. Many people find that they feel much better after eating this type of bread compared to fast acting breads that are made with lots of additives. The taste is also special because it has a natural sweetness from the wheat and a deep aroma that fills your entire home with a sense of comfort. It is a sustainable way to eat because you are reducing waste from packaging and you are using simple ingredients that have a low impact on the environment. This recipe teaches us patience and rewards us with a beautiful result that is both functional and artistic in its appearance.
Extra Tips for Better Taste
If you want to add more flavor to your bread you can try mixing in half a cup of shredded sharp cheddar cheese and some chopped jalapeno peppers for a spicy kick. You can also add dried herbs like rosemary or thyme to the flour at the very beginning to give the loaf a wonderful earthy scent that pairs well with soup. Another great tip is to use a little bit of whole wheat flour in place of one cup of the white flour to add more fiber and a nuttier taste to the finished product. Some bakers like to sprinkle some sesame seeds or poppy seeds on top of the dough right before it goes into the oven for an extra bit of crunch. If you like a more sour taste you can let the dough sit in the refrigerator for an extra day after the initial rise which will slow down the yeast and create more complex acids. Always make sure your salt is mixed well because a pocket of salt can be a very unpleasant surprise for whoever eats that slice.
Final Thoughts
Baking your own no knead bread is a journey that starts with a simple bowl of flour and ends with a feeling of great pride and a full stomach. It is one of those rare things in life where doing less work actually leads to a better result for everyone involved. We hope this guide helps you feel confident enough to try your first loaf and that it becomes a regular part of your kitchen routine for years to come. There is nothing quite like the first bite of a warm slice of bread that you made yourself so go ahead and get your hands a little bit dusty with flour.
Nutrition Details
| Nutrient Item | Amount Per Serving |
| Serving Size | 1 slice of bread |
| Total Calories | 160 calories |
| Total Fat | 1 gram |
| Saturated Fat | 0 grams |
| Sodium | 350 milligrams |
| Total Carbohydrates | 32 grams |
| Dietary Fiber | 2 grams |
| Total Sugars | 0 grams |
| Total Protein | 5 grams |
| Calcium | 1 percent |
| Iron | 10 percent |
Disclaimer
Please remember that every person has a body that reacts differently to different types of food and ingredients used in recipes. While homemade bread is often a healthy choice you should always listen to your own body and follow the advice of your doctor if you have specific health issues like gluten sensitivity or high blood pressure. The nutritional values listed above are only estimates and can change depending on the brand of flour or the exact amount of salt that you decide to use in your kitchen.